Digipak Process 2 - Photoshop
Digipak Process 2 - Photoshop
In this post I will be writing about what I have done so far with editing the digipak.
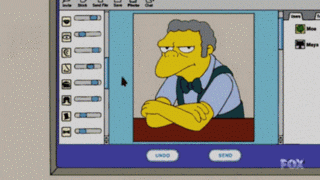


After finishing the photoshoot, I began choosing the photos I will want to definitely use for the digipak and started edited them to perfect it. Once I finished that, I then went on to experimenting different ways it could look. When I finalised the editing, I started trying out different fonts for the title.

After finalising the photo I then showed it my draft to my group and teacher. They gave me the feedback that the colour blue did not suit well and clashed. As well as this, they thought that the editing on top of the photo didn't look good as it takes away the attention from the beautiful photo. This meant that I took away all of the added elements on her face and made it more simple.


Below is a video of me editing the photo:
Now I will develop my draft and make it simpler yet effective to audiences before we show it to the focus group. It is important for me to make sure the digipak is as close to the style we want for the artist before we show the focus group because then when they give us feedback there hopefully won't be too many changes.
Comments
Post a Comment